Bill Williams Block

Overview
List of Indicators
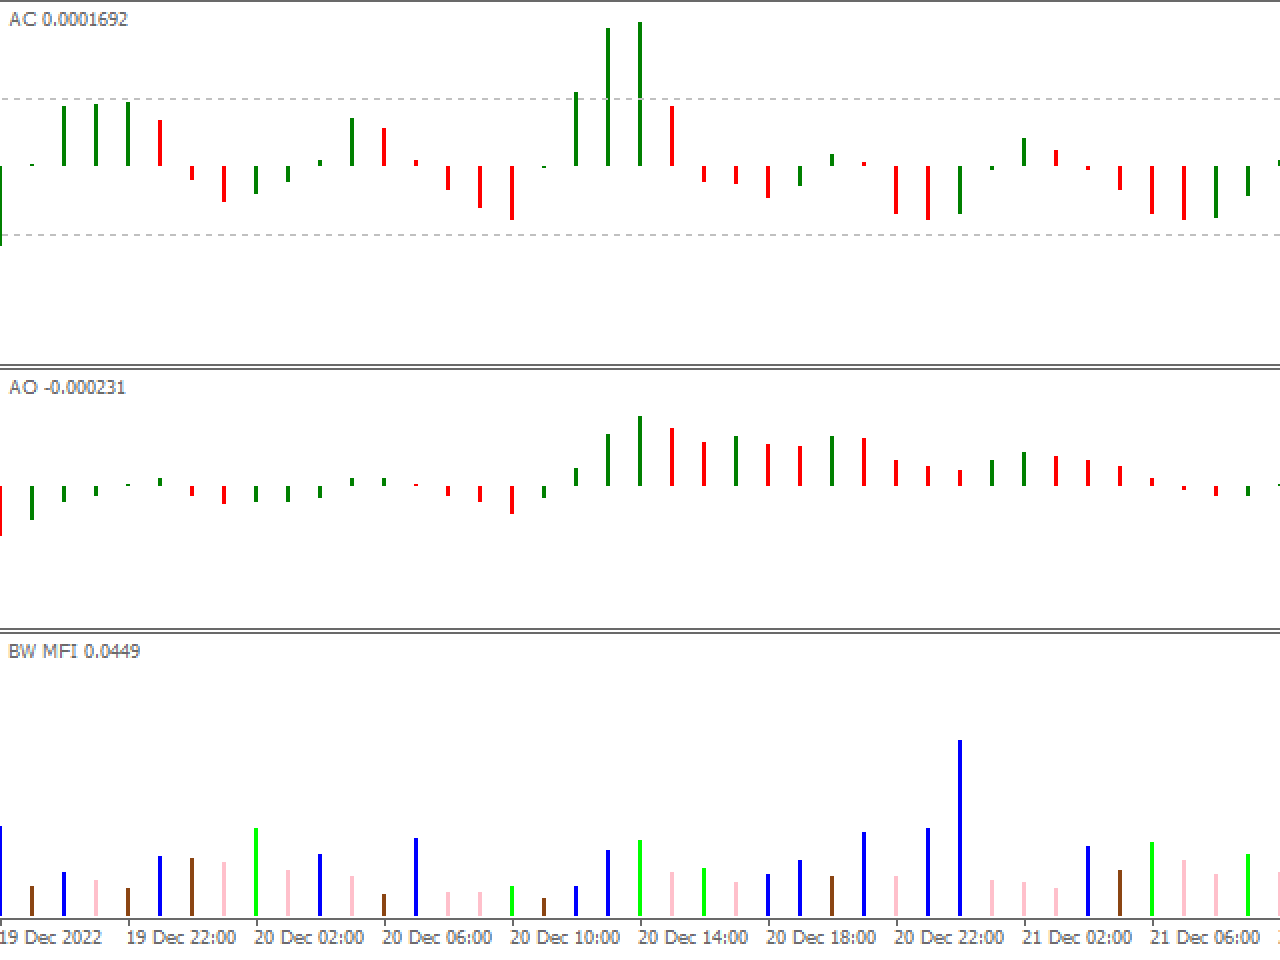
- Accelerator Oscillator
- Awesome Oscillator
- Gator Oscillator
- Market Facilitation Index
List of Strategies
- Cross Type 1
- Cross Type 2
- Up and Down
– 1. Cross Type 1 –
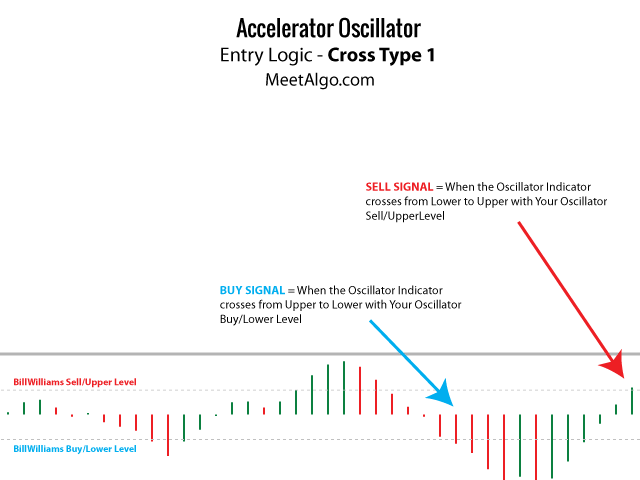
BUY SIGNAL = When the Oscillator Indicator crosses from Upper to Lower with Your Oscillator Buy/Lower Level.
SELL SIGNAL = When the Oscillator Indicator crosses from Lower to Upper with Your Oscillator Sell/Upper Level.
– 2. Cross Type 2 –
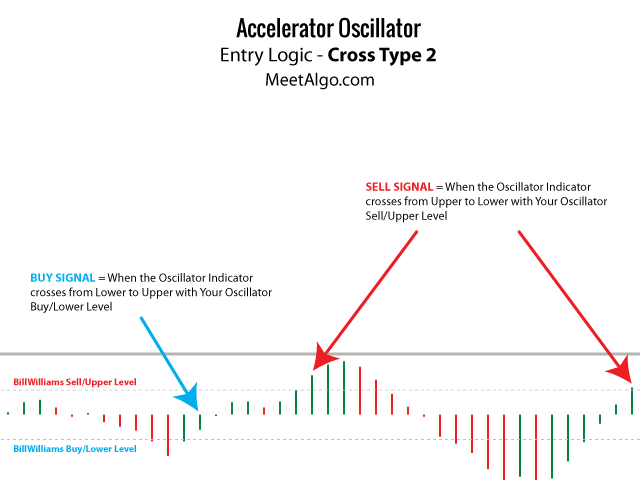
BUY SIGNAL = When the Oscillator Indicator crosses from Lower to Upper with Your Oscillator Buy/Lower Level.
SELL SIGNAL = When the Oscillator Indicator crosses from Upper to Lower with Your Oscillator Sell/Upper Level.
– 3. Up and Down –
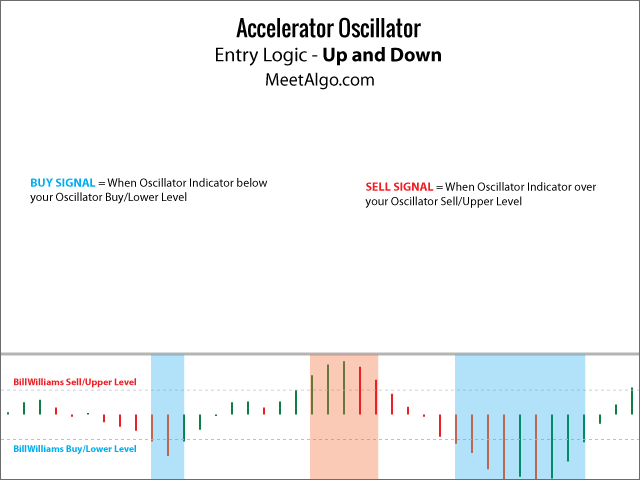
BUY SIGNAL = When Oscillator Indicator below your Oscillator Buy/Lower Level.
SELL SIGNAL = When Oscillator Indicator over your Oscillator Sell/Upper Level.
Others Inputs
- BillWilliams Signal Type – Select your trading type. How indicator opens trade.
- BillWilliams TimeFrame – Select indicator timeframe.
- BillWilliams Indicator – Select your Bill Williams indicator.
- Accelerator Oscillator
- Awesome Oscillator
- Gator Oscillator
- Market Facilitation Index
- BillWilliams Jaws Period –
- BillWilliams Jaws Shift –
- BillWilliams Teeth Period –
- BillWilliams Teeth Shift –
- BillWilliams Lips Period –
- BillWilliams Lips Shift –
- BillWilliams Method – Simple, Exponential, Smoothed, Linear Weighted
- BillWilliams Price –
- BillWilliams Volume –
- BillWilliams Buy/Lower Level – Set Your indicator Buy Level
- BillWilliams Sell/Upper Level – Set Your indicator Sell Level
- Signal Bars (0-Current Bar) – Select which candle the EA will consider as the signal. 0 means the current candle, and 1 means the previous candle from the current candle.
How to Setup
#Step 1 –
First, you have to active BILL WILLIAMS INDICATION SECTION to Set from EA’s Input
Active Oscillator = On
#Step 2 –
Select your trading type from Bill Williams Signal Type. It should be CROSS TYPE 1, CROSS TYPE 2, or UP and DOWN
#Step 3 –
Select your Bill Williams indicator from Bill Williams Indicator.
After your indicator selection is done, then configure your indicator. Like Oscillator Period, Oscillator Method, Oscillator Price, etc.
NOTE: All indicators don’t need configuring all inputs. For example, if your indicator is Gator Oscillator need to configure Jaws period, Teeth period and Lips period, but Awesome Oscillator doesn’t have any input so you don’t need to configure “Jaws period” you can avoid this setting because Awesome Oscillator doesn’t have this setting.
#Step 4 –
Set your Oscillator Buy/Lower Level for your Buy signal and set your Oscillator Sell/Upper Level for your Sell signal. Always set the lower level as the Buy level and the Upper level as the Sell level.
NOTE – Set your Buy or Sell level as the same as your indicator digit. For example, If you are using AC you can set BUY/SELL level as -0.00016 or 0.00016 but if you are using AO then you have to set all values are negative -0.00020 or -0.00070. Your BUY or SELL level must be set the same way as your oscillator level is drawn on your charts. If you value are negative then set Buy/Sell level is negative value.