Grid Trade (Loss Side)
 Grid trading loss is when orders are placed above and below a set price, thereby creating a grid of orders at incrementally increasing and decreasing prices. Overall the technique seeks to capitalize on normal price volatility in an asset by placing buy and sell orders at certain regular intervals above and below a predefined base price. For example, a trader could put buy orders every 10 pips above a set price, while also putting sell orders every 10 pips below that price to take advantage of the trend. A trader could also place buy orders below a set price, and sell orders above to take advantage of the ranging market. Below are the settings to guide you
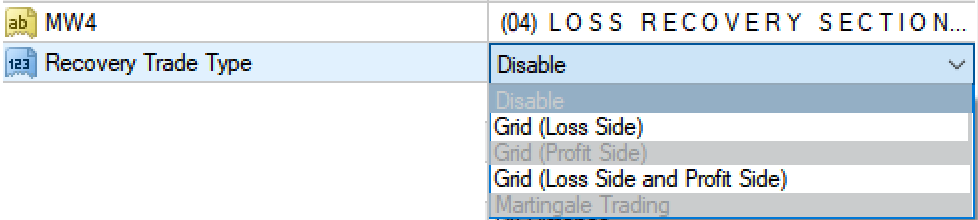
 To Active Grid (In Loss): Select input Grid (Loss Side) or Grid (Loss Side and Profit Side) from Recovery Trade Type
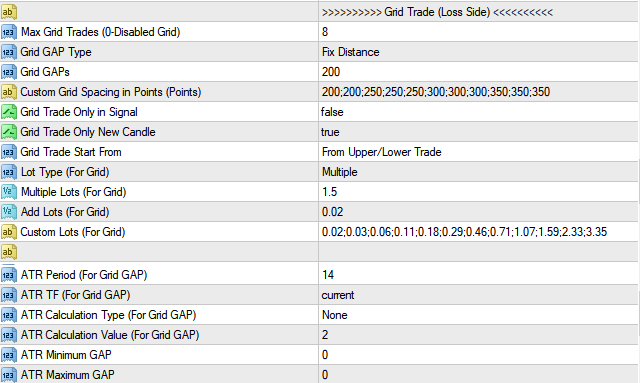
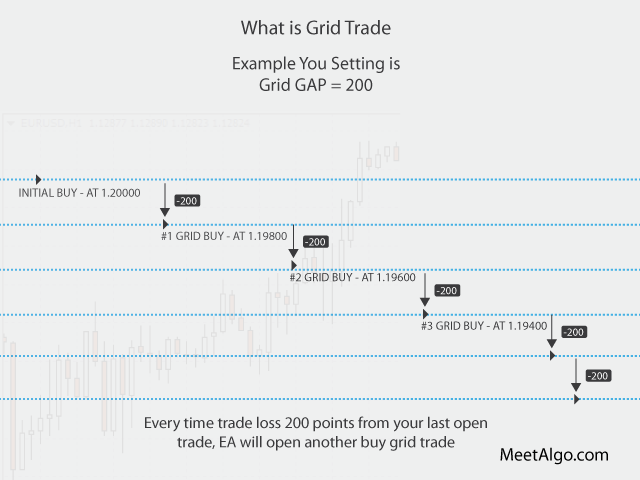
- Max Grid Trades (0-Disabled): This input function will specify the Maximum grid trades. Grid trading means when your initial trade-in loss is then EA will open several same side trade every loss distance. For example, if BUY EURUSD trade is in loss, the EA will trigger another BUY EURUSD trade and will not trigger any other trade if the trades are in profit.
- Grid GAP Type: As above, the grid-gap is the space interval from 1 trade to another within the same Grid. In short, it's the distance between Buy Trade 01 and Buy Trade 02. Select your grid GAP type. The EA has two Grid GAP types as below.
- Fix Distance: EA Grid trades will be based on this fixed distance. For example, you can set a fixed distance from Buy Trade 1 to Buy Trade 2 interval. In addition, this is a constant distance
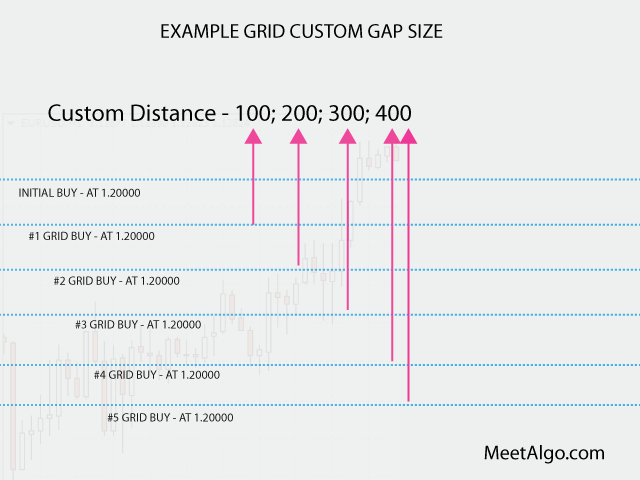
- Custom Distance: You can set custom distance for your every Grid trades separate by ";" according to your desired settings by stating 5 points of Buy trade 1 to buy trade 2, then 8 points from Buy trade 2 to Buy trade 3 and so on depending on the number of grid activated.
- Distance By ATR: When you select this then GRID GAP will calculate by ATR value. It is a dynamic type grid-gap, every time when grid trade will be open EA will check the current ATR value.
- Grid GAPs: Minimum distance to open a grid trade. It only works when your Grid GAP Type = Fix Distance
- Custom Grid Spacing in Points: You can set every grid GAP individually separate by ";". It only works when your Grid GAP Type = Custom Distance
- Grid Trade Only in Signal: if true, the EA needs to first check if your current trade loss with your grid gap + the signal also still valid then EA opens a grid trade when a valid signal exists. If the entry signal is invalid, no grid trade will be opened.
- Grid Trade Only New Candle: If true, the EA opens only one grid trade per candle. It doesn't matter how much grid-gap happened, EA only opens one trade per candle. (EA will fellow candle which timeframe you attach EA).
- Don't Open in Same Initial Candle: If true, the Grid trade will not open in the same candle your initial trade opened. It doesn't matter how much grid-gap happened. (EA will fellow candle which timeframe you attach EA).
- LotsType (For Grid): Select lots type. You choose how much lot size to be used after the GRID is activated.
- LotMultiplier (For Grid): Lot multiplier is a way of adding lot size automatically to every trade opened in a grid for the second, third, and subsequent orders.
- AddLots (For Grid): Lots will be added from your last opened grid trade.
- FixLots (For Grid): Grid trade's lots will be fellow the size of your initial lot.
- CustomLots (For Grid): Custom Lots for grid trades is the lot size which the trader use based on their own preferred settings and the custom lot must be separated by a semi-colon(";"). For example, a Custom lot “0.01;0.03;0.1” means that trade one within the grid will be 0.01 lot, trade 2 will be 0.03, and trade 3 will be 0.1
Use the below setting when your Grid GAP Type = Distance By ATR
- ATR Period (For Grid GAP): Put ATR period.
- ATR TF (For Grid GAP): ATR Timeframe
- ATR Calculation Type (For Grid GAP): Select ATR Calculation Type
- None: When you select none then grid gap will be as current ATR value. Example- if your ATR value is 0.0080 that mean you current GAP will be 80 points.
- ATR Multiple: If you select this then grid gap will be as current ATR value with your multiple value (You will set multiple value into EA's input ATR Calculation Value). For example- if your ATR value is 0.0080 that mean you current GAP will be 80*ATR Calculation Value points.
- ATR Division: If you select this then grid gap will be as current ATR value with your division value (You will set division value into EA's input ATR Calculation Value). For example- if your ATR value is 0.0080 that mean you current GAP will be 80/ATR Calculation Value points.
- ATR Calculation Value (For Grid GAP): Set value when your ATR Calculation Type = ATR Multiple/ATR Division.
- ATR Minimum GAP: Example If you set ATR minimum gap 100 points that mean when grid trade comes and your ATR GAP is 80 points then EA will open grid trade with 100 points. So if any ATR value is below 100, EA will open the grid with 100 points.
- ATR Maximum GAP: Example If you set ATR maximum gap 500 points that mean when grid trade comes and your ATR GAP is 800 points then EA will open grid trade with 500 points. So if any ATR value is above 500, EA will open the grid with 500 points.